Requesting a Standard or Wildcard SSL Certificate
After you purchase an SSL, you must activate the SSL credit, and then begin the process of requesting the certificate. Before you start, make sure the registration information for your domain name is up-to-date and accurate.
These instructions apply to two types of SSLs:
- Standard (single domain) — This SSL encrypts information for only one Web address, such as coolexample.com. It works well for shopping cart sites, and it’s also a good way to encrypt login information.
NOTE: One certificate protects both www.coolexample.com and coolexample.com.
- Wildcard (single domain with unlimited subdomains) — With this type of SSL, you can request the certificate for *.coolexample.com to secure subdomains such as photos.coolexample.com, blog.coolexample.com, email.coolexample.com and more. For more information, see What is a Wildcard SSL certificate?
NOTE: Allow about 10 minutes to complete the request in your account.
To Request a Standard or Wildcard SSL Certificate
- Log in to your Account Manager.
- Click SSL Certificates.
- If you’re using a free SSL credit, click Set Up, select the credit you want to use, and then click Set Up.
NOTE: The newly activated credit displays as New Certificate. If you don’t see it right away, wait a minute and then refresh your browser.
- Next to the SSL certificate you want to use, click Launch.
- If you see the following option display in your control panel, click here:
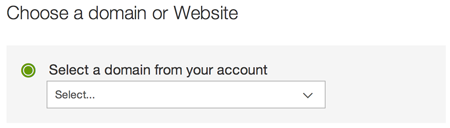
If you do not see this image, continue to the next step. - If this is your first certificate, you must agree to the Subscriber Agreement.
- Click the Credits folder on the left.
NOTE: If you do not see the credit, refresh your list by clicking Update List in the grey bar.
- Click Request Certificate next to the certificate credit you want to activate.
- Select the appropriate hosting type for your certificate:
- If you host your website in the same account, select Web Hosting, Grid Hosting, Website Builder, Quick Shopping Cart or Dream Web Site or Dedicated Server or Virtual Private Server (VPS), with Simple Control Panel, and then select your domain name from the list.
- If you host your website on a dedicated server or with another provider, select Third Party or Dedicated Server or Virtual Private Server (VPS) without Simple Control Panel, and then enter the certificate signing request (CSR) in the field provided.
TIP: To get a copy, right-click the file, select Open With, and then select a text editor like Notepad.
Paste all of the text, including —-BEGIN NEW CERTIFICATE REQUEST—- and —-END CERTIFICATE REQUEST—-, in our online application.
- Select your preference for the certificate issuing organization, and then click Next. For more information, see Using the Right Issuing Organization for Your SSL.
- Select your preference for validating the domain name you are setting up for your certificate, and then click Next.
- Verify the accuracy certificate request, and then click Next.
After you submit your request, we must verify your application. You can monitor the progress of your certificate request in the Pending Requests folder (more info). Also, be sure to check your email for further instructions.
If you selected Web Hosting, Grid Hosting, Website Builder, Quick Shopping Cart or Dream Web Site when you requested your certificate, we automatically update the IP address for your website when your SSL is approved.
If your domain and hosting are in different accounts, you must update the A record for your domain with the new IP address. See Finding Your Hosting Account’s IP Address for more information. To learn how to update your domain’s A record, see Managing DNS for Your Domain Names.
NOTE: Your site might be inaccessible until you update the A record.
*Information provided courtesy of GD Support*