Generating a CSR in Microsoft Exchange 2007
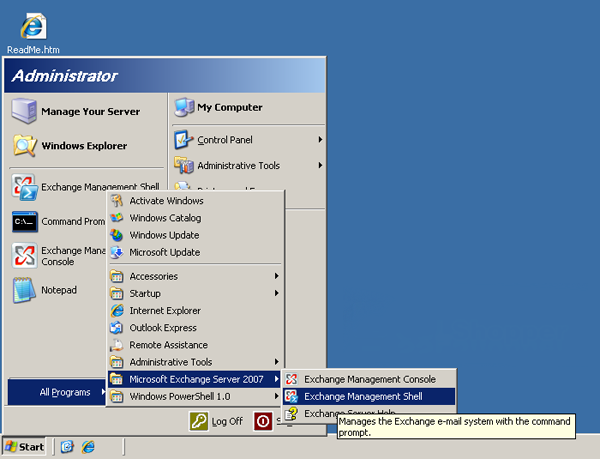
Click on the Start menu, go to All Programs, then Microsoft Exchange Server 2007 and click on Exchange Management Shell.
To complete your online request form for an SSL, you need a Certificate Signing Request (CSR). Follow these instructions to generate a CSR for your website. After you generate your CSR, copy and paste it into the CSR field on the SSL certificate request page.
We recommend that you use a Multiple Domain Unified Communications Certificates (UCC) with your Microsoft® Exchange Server, since you probably need to secure more than just one domain name.
To Generate a Certificate Signing Request — Microsoft Exchange Server 2007
- Click Start, All Programs, and then Microsoft Exchange Server 2007.
- Click Exchange Management Shell.
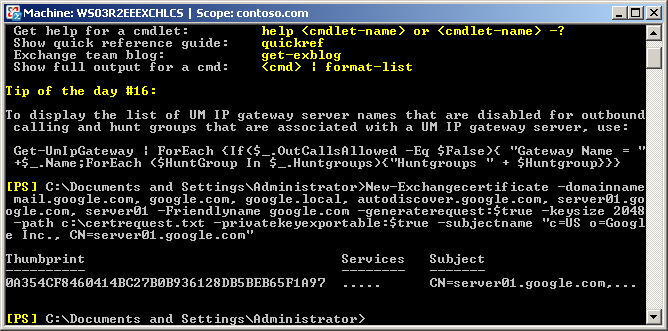
- Copy following command and paste it into a plain-text editor like Windows® Notepad in order to edit some of the fields
New-ExchangeCertificate -generaterequest -keysize 2048 -subjectname “c=Your Country, l=Your Locality/City, s=Your State, o=Your Corporation Name,cn=YourMainDomain.com” -domainname SubjectAlternativeName1, SubjectAltName2, SubjectAltName3, SubjectAltName4 -PrivateKeyExportable $true -path c:\certrequest.txt
- Update the following fields:
c— Two-letter country code of your organization’s country of residencel— Full name of your organization’s locality or citys— Full name of your organization’s state or provinceo— Your Organization’s legally registered name (company or person’s first and last name)cn—The first/main Fully Qualified Domain Name (FQDN) to be secured that will always be visible in the certificate details-domainname— The comma-separated list of additional domains that are included in your certificate and referred to as Subject Alternative Names (SANs). Deciding what SANs to use depends on the services you are running. You need to know how your server is configured to properly secure everything. But, depending on your configuration, consider adding the following SANs:- The external name that people use to send and receive mail: mail.yourdomain.com. Whereyourdomain.com is your domain.
- The Fully Qualified Domain Name: yourdomain.com. Where yourdomain.com is your domain.
- The name for your Autodiscover services (Autodisover automatically configures profile settings to work with mobile phones and other services): autodiscover.yourdomain.com. Where yourdomain.com is your domain name.
- To use Outlook Web Access internally, you need to include two NetBIOS names: owa1.yourdomain.localand owa1. Where yourdomain.local is the NetBIOS name of the server.
NOTE: You don’t need to request a new CSR each time you add or remove a SAN. Our SSL Management console allows you to manage SANs without generating new CSRs each time you want to add or remove a SAN.
-PrivateKeyExportable $true— Keep this command if you want to enable export of the requested certificate so you can import it into a client’s computer or another server.-path c:\certrequest.txt— The complete path and filename where the resulting CSR file is placed when generated. In this example, once the CSR is created, you will find it on the root of your C: Drive.
- Once you are finished editing the command, paste it into the Exchange Management Shell utility, and then hit Enter on your keyboard.
- Your Thumbprint appears if you were successful at creating the CSR.
- If you need to troubleshoot the installation of your certificate you might need a copy of your Thumbprint. To copy it, right click your mouse and select Mark, highlight the Thumbprint, and then hit Enter on your keyboard.
- Locate, copy, and paste the CSR into our online application.
- To get a copy right click on the .req file, select Open With, and then select a text editor like Notepad.
- Paste all of the text, including —-BEGIN NEW CERTIFICATE REQUEST—- and —-END CERTIFICATE REQUEST—-, in our online request form.